Version: ■ 4.9 ■ 5.0 ■ 5.1+
The Schedule Send feature in PoliteMail allows users to schedule a measured message to be sent at a future date and time. The message gets sent from Outlook and is then held securely within the PoliteMail Server before it is released at the scheduled date/time. PoliteMail does not require the sender of the email message to be online at the time of release.
Scheduled Sends follow user role and group assignment permissions. For example, an Admin can see all Scheduled Sends on the account, while a User can only see the sends they have scheduled.
Scheduling a Send
First, compose your message.
DESKTOP To schedule a measured message for future release, compose the message in Outlook, then select PoliteMail > Schedule Send.
ONLINE PMUA Scheduled Sending is found under the Send Options button
M365 Scheduled Sending is found below the big blue Send & Measure button in the PoliteMail panel on the right.
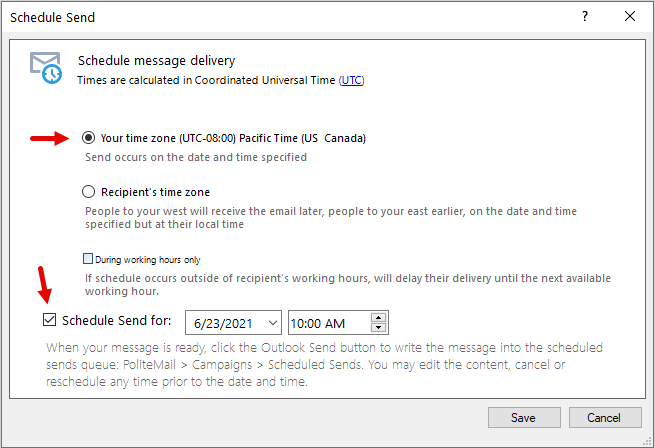 In the Schedule Send dialog box you can choose whether to schedule the email to send using your time zone, or the recipient’s time zone.
 - To schedule a send in your time zone, select the button next to Your Time Zone.
- To schedule a send in the Recipient's Time Zone, check the other box. This will use the recipient's Outlook working hours and auto-schedules the broadcasts by time zone. This type of staggered delivery can be especially helpful for multiple offices around the country, or around the world. It ensures consistency for messages that are time sensitive, or targeted to be read at specific times of the day.
- Along with the first two options, there is a box that will allow the sender to make sure the message only gets delivered inside of the recipient’s working hours. This can be beneficial for critical messages to be delivered when the employee is scheduled to work, and also help to not disturb an employee if they have emails forwarded to their mobile device during off hours.
Essentially, an employee's (email account) working hours is stored in Entra ID, which PoliteMail can extract when the distribution group is expanded. By default, in Outlook, the Work Week is set from Monday to Friday, and the Work Day Hours are from 8 A.M. to 5 P.M. Also, the Week begins with Sunday based in the time zone of the Outlook user.
Users can set/reset their working hours in Outlook, using Calendar settings.
If the scheduled delivery time falls outside of the recipient’s working hours, PoliteMail will delay the delivery until their next available working hour.
When working hours are unknown, PoliteMail uses the recipient’s time zone according to their most recent Open. If no recent open exists, PoliteMail will default to the sender’s time zone.
- Check the Schedule Send For box and enter in the date you want the email to send. You can use the drop down to select a time, or manually enter a specific time in hh:mm am/pm format.
- Select Save. Click Send. Note you must hit 'Send' or the message will remain a Draft.
 In the Schedule Send dialog box you can choose whether to schedule the email to send using your time zone, or the recipient’s time zone.
 Scheduled Sends will appear in the Sent folder even though they are scheduled only. This can be confirmed by going to Campaigns > Scheduled Sends and you will see the Message there.
Accessing and Editing the Scheduled Message
- Select the PoliteMail tab within your Outlook window.
- Select Campaigns >Scheduled Sends.
- Click the desired Scheduled Message.
- Version 5.0: Click on the selected message to open up scheduling options, including subject line, scheduled date and time, and/or from email. Click Save when you are done making changes.
- Version 4.9+: Click the Edit button to open up scheduling options, including subject line, scheduled date and time, and/or from email. Click Save when you are done making changes.
NOTE If you needed to change the order of your sends, you can edit the send times so messages go out in your preferred order. You can not change the content of the scheduled send. If you need to change the content, you would have to delete this send and compose and schedule a new one.
- With the message selected you can also send a Preflight Test Send.
Enabling/Disabling a Scheduled Send
If you need to stop a send, you can disable it. Please note that you can not do this if the message is already in the process of being sent.
Version 5.0: Click the message to open the Edit dialog box. Uncheck the enabled box. This will disable the send.
Version 4.9+: Click the message and then the 'Edit' button. Click the button in the second column (an envelope icon with a clock on it) to disable the send.
Disabled Scheduled Sends will still be in Scheduled Sends and you can enable it by checking it again once you are ready for it to go out. If it's past the message's scheduled send time, it will send out immediately.
 Deleting a Scheduled Send
 Deleting a Scheduled Send
To delete a scheduled send, go to PoliteMail > Campaigns > Scheduled Sends. Click on the message you want to delete and click the Delete button next to Actions (in version 4.9+, click the 'x' button). When you delete a scheduled send, it will prevent the email from going out.
Scheduled Sends in your Metrics
If you had 'During Working Hours only' checked and PoliteMail delayed sending the message until the recipient's working hours, PoliteMail will create a segment for that send and it will display when you click the Segmentation button at the top of the report.
For messages that were sent to correspond to the same time in different time zones, a Campaign will automatically be created by PoliteMail with the same name as your Subject line. Each separate send time will show as a separate message in the Campaign when you view the Campaign report. There is also a button at the top of the Campaign report where you can view the metrics for each individual send instance.

