If you are using Outlook 2016 with PoliteMail you may notice that certain font style revisions such as font size, bold/italic or font color may not hold within your templates or email messages. These same messages may view as revised on systems running older versions of Outlook. Microsoft Outlook 2016 combines style/theme code for fonts when saving and forwarding html emails, different than previous versions of Outlook. This can affect stored PoliteMail templates in Outlook 2016 and email messages, and generally happens when changing font styles in a section of your email message/template that varies from the brand theme.
Check your emails before sending by doing a Preflight Test Send. If you notice that your font size, style or color changes are not holding you can use the following steps to correct the message/template.
First: Uncheck Cascading Style Sheets (CSS)
 In Outlook, go to File > Options > Mail
- Scroll down to the Message Format section
- UNcheck the “Use Cascading Style Sheets (CSS) for appearance of messages (if it is enabled)
- Click OK
 In Outlook, go to File > Options > Mail
Second: Enable Cut, Copy, and Paste Options in Word
- In Microsoft Word, go to File > Options > Advanced.
- In the Cut, copy, and paste section, we recommend setting all of these to 'Keep source formatting' for consistency. At the very least, set 'Pasting from other apps' to 'Keep source formatting'. This should retain the formatting you've made in Word, whereas setting it to 'Use Destination Styles' will override your formatting with the style defined in Outlook.
Note that in later versions of Word, the final option, pasting from other programs, no longer uses Keep Source Formatting as the default.
Third: Add Font Preferences to the Styles Menu
If that doesn’t work, try adding your font preferences to the Styles menu.
 Open the template or email message that is exhibiting font display problems.
- Click on the Format Text tab.
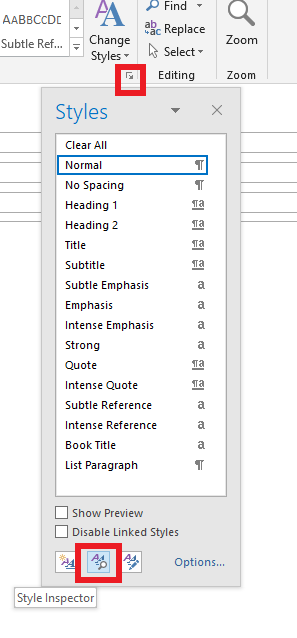
- Within the Change Styles section click the expander arrow in the lower right corner to bring up the styles menu
- At the bottom of the styles menu click on the middle icon to bring up the Style Inspector
- Select the text that isn’t holding the format, and make your font modifications, i.e. size, color, bold/italic
- Select the newly edited text (in the correct format). It can be just one word instead of a whole sentence.
- Click on the 1st small icon at the bottom of the Style Inspector to Reveal Formatting
- Check that the selected text in the top box is the newly formatted text
- Click on the middle icon on the bottom of the Style Inspector to create a New Style
 Open the template or email message that is exhibiting font display problems.
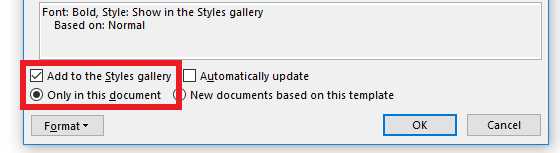
- Give the Style a name that will make sense to you, i.e. Orange12pt or 12ptMonthDte
- At the bottom of the menu select to Add to the Styles gallery (this will allow you to use the same style easily within the email if there are other sections that require it)
- Select the radio button Only in this document – you do not need to select all new documents based on this template as this refers to Outlook templates
- Click OK.
The newly defined style will now show up in the Style list and the Style ribbon. Be sure to select and apply the style to any text within the email that requires the same treatment.
Notes
- You will need to create styles for each of the font treatments that did not hold when you sent the Preflight test.
- If working in a template – once all new styles have been applied save the Template – PoliteMail > Save As Template (You should create a new email from the template and do another Preflight Test Send to check that all changes are now stored with the template)
- If working in a message – once all new styles have been applied, you can save the message if sharing with co-workers (File > Save As > Outlook unicode message) or send a new Preflight Test Send before sending to your distribution lists.
- The template (message) should hold all font style changes for users in Outlook 2016 and previous versions. If you do create new messages from the template and add content that includes font changes, you may need to repeat the steps for the new content in the new message.
