Applies To: ■ PoliteMail Desktop ■ PoliteMail Online □ PoliteMail M365
Version: □ 4.9 □ 5.0 □ 5.1 ■ 5.2+
Starting with version 5.2 of PoliteMail, you can view what other people are planning to send in the future with an Editorial Calendar! You will see an icon to switch to Calendar View when viewing the list of Scheduled Sends. This is a very visual and useful way to see what messages are being planned to go out, so various users of PoliteMail can coordinate what is being sent.
The Calendar View is available to all roles in PoliteMail, so that any PoliteMail user can see what sends are planned and coordinate accordingly.
The Calendar View Window
- Gray events in the Calendar view are not yet Scheduled Sends but are rather "penciled in" time slots for a future message. They show a date and time, but do not have an actual message associated with it yet.
- Blue events are actual Scheduled Sends with a message associated with it. The right side of the bar displays the time it will be sent.
- Use the buttons in the upper right to switch monthly to weekly, daily, or agenda view, and buttons in the upper left to go back, go to today, or go forward.
- Clicking on any date in month view will switch to the daily view.
- The times shown display in the Sender's time zone.

Converting a Time Slot to a Scheduled Send
To convert a penciled in time slot to a Scheduled Send, just double-click on it. This will open the composition window so you can create your message, with the subject, recipients, and schedule already entered for you.
Only Time Slots can be edited in the Calendar View; use the Grid View to edit a Scheduled Send.
Editing a Time Slot in Calendar View
Although you will be able to view all time slots and Scheduled Sends, you can edit or delete only time slots you have access to (same Business/Region), just like shared content.
 If you hover over a Time Slot with your mouse, you will see a pencil icon on the right to edit it.
- If you only need to modify the time, you can also drag the center edges in any view to shorten or lengthen the time, or drag the entire Send to a different time.
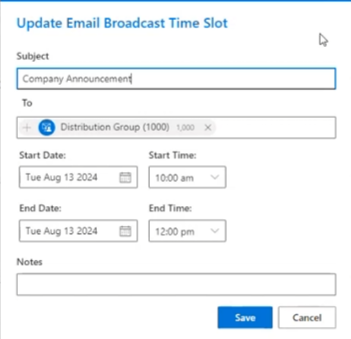
- When you click the pencil icon to edit it, a window will appear where you can modify the subject, recipients, time to send, and enter any notes.
- If you have not yet determined the recipients, you can enter only some or leave it blank to enter in later. You can enter individuals or lists, or a combination of both.
- The Notes field is optional but allows you to explain the nature of the send for others to see. Notes are not visible to any recipients or in your message.
- When finished with your edits, click 'Save' and you're all set.
Deleting a Time Slot for a Scheduled Send
When hovering over a scheduled time slot with your mouse, you will see a trash can icon on the right to delete the Send. You will be prompted for confirmation before the time slot is deleted.
Create a Time Slot for a Scheduled Send
The Calendar View allows you to create a time slot for a Scheduled Send as well. Think of this as "penciling in" a time slot for a planned message so others can see it, without actually having created the actual message yet.
- Go to the Daily view for the date you want to create a time slot for, and drag your mouse from the start time to the end time. This is just like you might do when creating a time slot in your Outlook calendar, for example.
- A window appears to create a new Email Broadcast Time Slot. Enter the subject, recipients, start and end time, and any notes.
- When finished, click 'Save'. The time slot will now show in all views.
- If you're not sure what day you're going to send a message, you can drag the time slot to cover multiple days to pencil those slots in also.
|
|
|
|
|
 If you hover over a Time Slot with your mouse, you will see a pencil icon on the right to edit it.
