Applies To: ■ New PoliteMail ■ Legacy PoliteMail
Version: ■ 4.9+ ■ 5.0+
Filters are a search parameters that are used to generate a list of contacts. What if you want to create a list for either people in the Eastern region or in Seattle, or were hired after a specific date? Filters can be based on an existing list, predefined Contact fields, or Custom Fields that you have created.
Step 1: Determine Filter Criteria
You can create a Filtered List based on a wide variety of standard criteria:
- People who are or are not a member of another PoliteMail list or lists
- People who are or are not in a specific city, state, or country (or multiple)
- People with a specific language preference
- People who are or are not in a specific time zone (or multiple)
- People assigned to a specific Business or Region. Business and Region is set and defined by your Administrator.
In addition to these standard criteria, you can also create a filter based on a Custom Field, such as people with a specific title or role. To do this, the Custom Field must be defined first.
Step 2: Create the Filtered List
Time to create the list!
- DESKTOP From the POLITEMAIL tab, click the Lists button.
- ONLINE PMUA If if isn't displayed already, click the ≡ to go to Mailing Lists > Mailing Lists.
The Lists grid displays. Click the 'New' button at the top and select 'Filtered List'
Basic Filtering
Basic Filtering allows you to filter on Custom Fields, PoliteMail lists or Contact properties (such as a company or title). With basic Filtering, you can add as many criteria for the filter you wish by clicking the 'Add Filter' button; all members of the list must meet ALL of the criteria you've created (AND logic only).
PoliteMail version 5.0 and lower offers only Basic Filtering, and allows you to filter only based on Custom Fields.
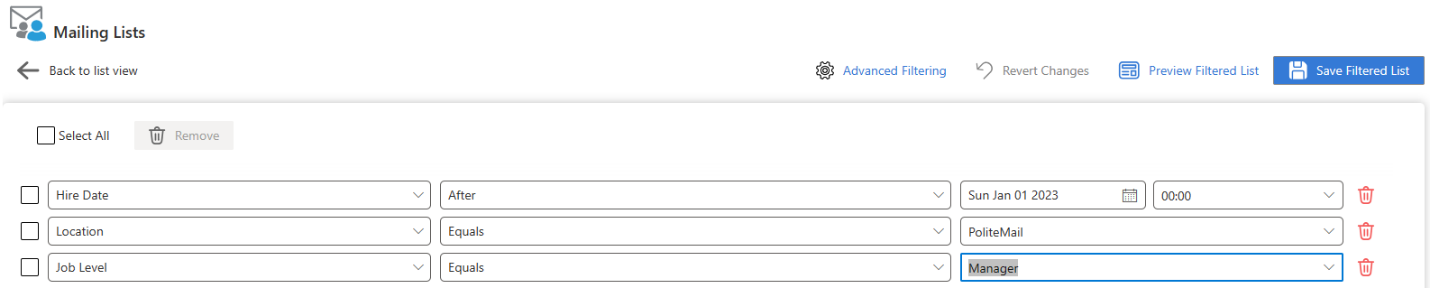
Column |
Description |
1 |
Select the field to filter on. You will not only see your Custom Fields, but also Contact properties and any already-created PoliteMail Lists (including Lists created using the old Filtered Lists). |
2 |
Choose the operator to use. What displays here will vary depending on the data type of the field (for example, a Date type will show ‘before’ and ‘after’ as options, whereas a String will show ‘contains’). |
3 |
Select or enter what the filter line should look for. For clarity, only the 40 most-used items will display by default, but you can type anything you wish. Your Administrator can increase this to as much as 100, and fields with fixed options will display all options. |
Advanced Filtering
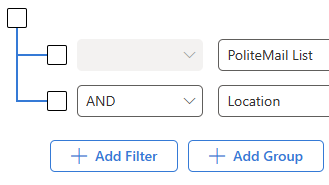 Click the ‘Advanced Filtering’ button to switch to the advanced filtering mode, which allows you to use ‘OR’ operations as well as Grouping. You can make this view the default by clicking the ‘Set as Default’ box if you wish.
The Advanced Filter screen has three additional items compared to the Basic Filter:
- A ‘tree structure’ on the left side of your filter conditions,
- A drop-down allowing you to specify ‘AND’ or ‘OR’ for the filter condition, and
- A button to create a Group.
OR Conditions
While AND conditions will require all conditions to be true, OR conditions only require any one of them to be true. For example, basic filtering will only allow you to create a filter to find employees hired after January 1 and are located in New York, but an OR condition would allow you to find employees in either New York or Dallas.
Grouping
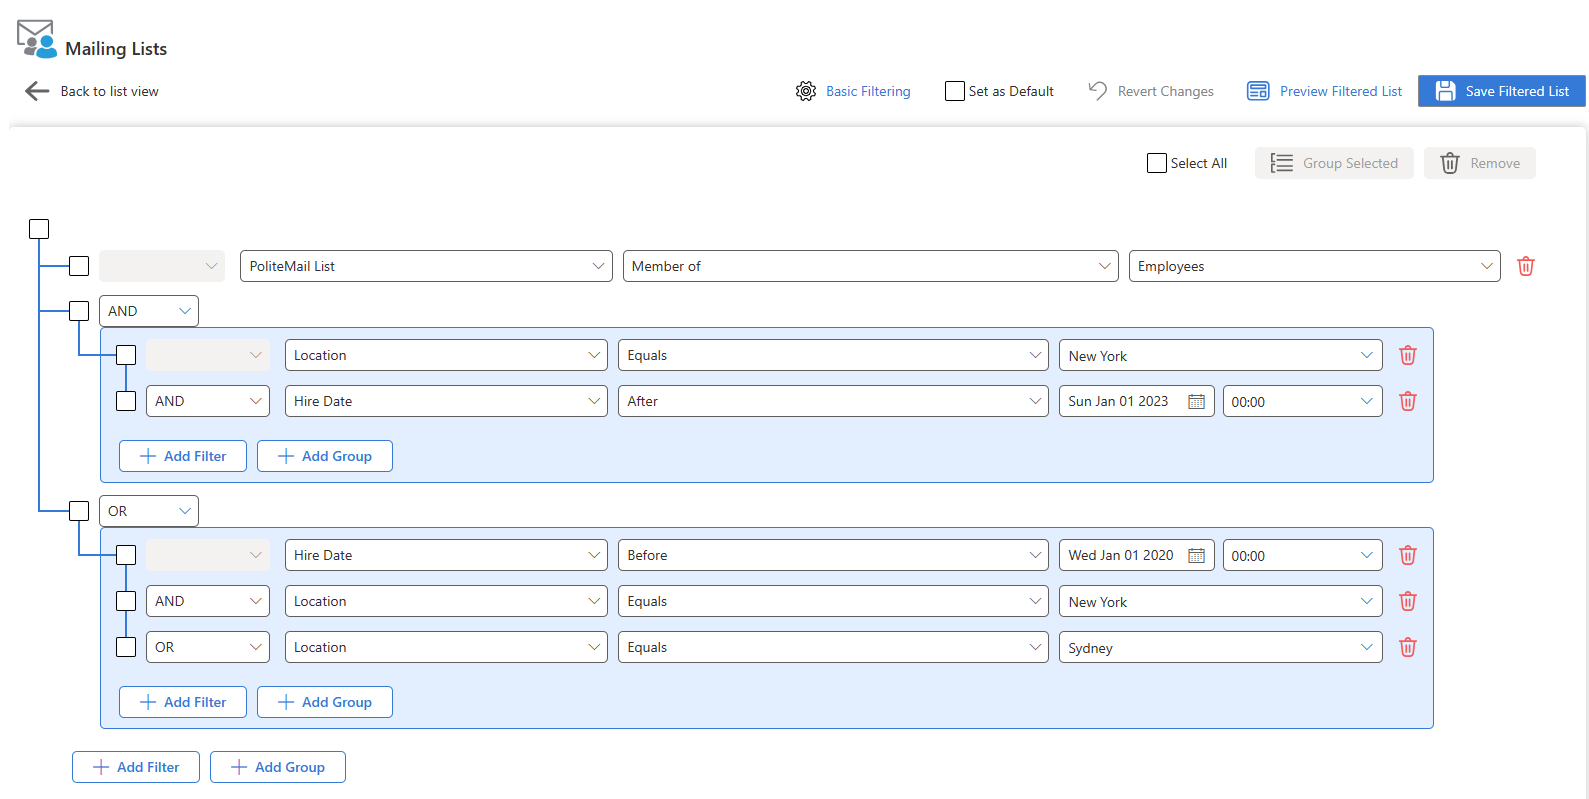
Groups are like a set of parentheses in an equation; PoliteMail will filter the results of each group first, before filtering them together. For example, the filter below will look at all members of the PoliteMail list and are either hired after Jan 1, 2023 and based in New York, or hired before Jan 1, 2020 and are either in New York or Sydney.
Finishing Up
Preview your List!

Click the Preview button to see how many results are a match to the current filter. You can also search for a specific contact name, display name, or email, so you can see if it is filtered or not.
Everything Look Good?
 Click the Save button to be taken to the Membership screen for that list.
The Filter Membership Screen
The member screen has two new icons at the top:
- The icon allows you to quickly change the name of the List.
- The icon will show what Filters used to create the List. Simple Filters may show more details, while more complex Filters will open the Filter screen when clicked for easier reading.

Syncing Your Filters
 If you want to ensure that all of your contact lists are using up to date contacts based on your filters, use the 'Sync Filtered Lists' button from the Lists page. This will force the filters to update the contact lists using the most recent contact information.
Filtering FAQs
Can I create a Filtered List from the list of people? Yes! When you go to Mailing Lists > People, you can apply any compatible filters on that screen and a 'Create Filtered List' button will appear for you to save your results as a Filtered List. However, you cannot manually assign people to a Filtered List (since they will be excluded as soon as the filter is run).
How do I create a Group from rows I’ve already created? Click on each row’s checkbox on the left, and then clicking the ‘Group Selected’ button.
Can I create a Group inside another Group? You can create a Group inside another Group one level deep, but you cannot create a Group inside a Group that is already in another Group.
What is the maximum number of rows I can create in a Filtered List? This limit is set by your Administrator.
What happens if I create an Advanced Filter and then switch to the Basic Filter? If the filter you are looking at using OR functionality or Grouping, you will need to save or modify the list first. Otherwise, you can easily switch between the two with no issue.
What does the ‘Revert Changes’ button do? The ‘Revert Changes’ button is not the same as undo! Clicking this button will reset the filter to the last version you have saved. If you have not yet saved your Filtered List, it will do nothing.
Will any List made in the old version work in the new version? Yes, but it needs to be converted first. Select the List, then click on Modify Filtered List > Convert. This will modify the list to work in the new List environment, but keep in mind this is a one-way conversion; the List will no longer be able to be edited in the old Filtered Lists interface.
Resolving Errors with Filtered Lists
There are two possible errors to look out for when creating Filtered Lists:
| Error | Description | Resolution |
|---|---|---|
| Invalid Field Data | The contents of the field do not match its Data Type, such as 'Hire Date' having text in it. Any filters used on that field will return False for that contact. | You can create a list of all contacts with invalid data for a specific field using the 'Has Valid Value' filter. You can export all contacts with invalid data by viewing the 'Validated' and 'Validation Notes' columns in the contacts screen and filtering on 'Validated = False'. |
| Invalid Filtered Lists | This is most common if a Filtered List references another List that has been deleted, setting a Custom Field that a Filtered List uses to be hidden, or by changing the data type of a Custom Field that creates an error (such as a filter that checks if a field is less than 30 and changing the data type of that field to Boolean). | Invalid filtered lists will be marked with a red X in the Valid column of the Mailing List grid. Before these lists can be sent to, you will need to open them up, fix any error messages shown on the page, and save the list. |

