Applies To: ■ PoliteMail Desktop ■ PoliteMail Online □ PoliteMail O365
Version: ■ 4.9 ■ 5.0 ■ 5.1+
What's the Difference?
It's important to know that Subscribe vs Opt-In, as well as Unsubscribe vs Opt-Out, are slightly different:
 Subscribing allows the recipient to join any Mailing Lists you have designated beforehand (called Subscription Lists).
- Unsubscribe will remove the recipient from that Mailing List; they will remain subscribed to any other Lists they have subscribed to.
- Opt-Out removes the recipient from all messages from the sender's domain, now and in the future, unless they opt back in again.
- Opt-In is an option a recipient can select to receive all messages coming from this domain. This is typically only used to 'undo' an Opt-Out if a recipient changes their mind.
 Subscribing allows the recipient to join any Mailing Lists you have designated beforehand (called Subscription Lists).
Subscriptions
With PoliteMail, you can allow recipients to subscribe to any Mailing Lists you wish to make available to them. To comply with privacy laws, PoliteMail also allows you to give the recipient the ability to Opt-out.
To enable this, you will do three things:
- Decide what Mailing Lists to make available for subscription (or create new ones).
- Customize the Subscribe and Opt-in windows, to suit your taste.
- Enable Opt-out in the message (or globally).
Step One: Marking Lists as Available for Subscription
You can mark any existing Mailing List as a Subscription List to allow recipients to subscribe to it. When a recipient chooses to subscribe, a list of all available Mailing Lists will display, and the user can select which one(s) to subscribe to.
- Go to PoliteMail > Lists > Mailing Lists. Any Lists that are Subscription Lists will have a green check mark in the Subscription column.
- If you don't see the Subscription column, click on any column heading to view a list of available columns to view, select it.
- You can also create a new List and import contacts into it by click the 'New' or 'Import' buttons.
- Select the list you want to enable for subscription to open the editing fields.
- Version 5: When you select the list, a panel appears on the right. Click the Subscription box.
- Version 4.9: When you select the list, click Edit is the far-right column. Under the Subscription column, change No to Yes, and then click Update.
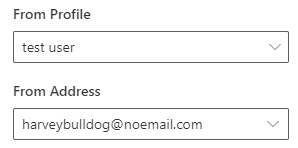 Once the box is checked, you will be prompted to select a From Profile and From address at the bottom of the panel. To comply with email marketing law (the CAN-SPAM Act in the USA), you must provide a clear sender name and reply-to email address. Select the appropriate username and email address from the drop-downs.
 Once the box is checked, you will be prompted to select a From Profile and From address at the bottom of the panel. To comply with email marketing law (the CAN-SPAM Act in the USA), you must provide a clear sender name and reply-to email address. Select the appropriate username and email address from the drop-downs.
Step Two: Customizing the Opt-in / Opt-out Windows
Next, you may want to do any of the following:
- Customize the logo and the text that appears in the Subscription Options window (this is the window that appears when the user clicks the link in your Opt-in / Opt-out footer).
- Customize the logo and the text that appears in the Opt-in window. The Opt-in window can be customized for each List.
- Obtain the URL for users to subscribe, so you paste the URL in other messages, such as via Teams or Slack.
- Whitelist specific domains that users may subscribe from, omitting the rest.
Customizing the Subscription Options Window
This is the window that appears when the user clicks on the link in your Opt-out footer.
- Go to Account > Subscription. The Subscriptions screen appears.

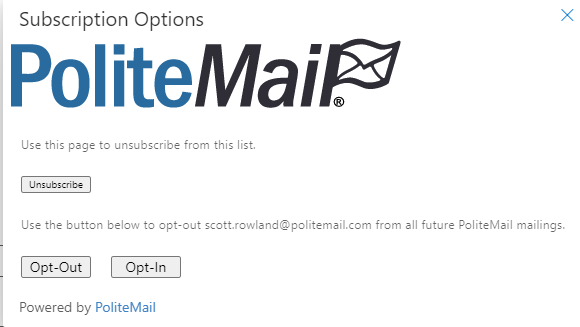 Click on the 'Opt-Out' button.
- A preview of the image that will display in your opt-out message is shown below the button. You can click 'Replace' to change the icon or 'Clear' to remove it.
- Click 'Preview Opt-out Page' to view what your opt-out window currently looks like.
- Click 'Show Unsubscribe Settings' to allow the user to unsubscribe from the list, in addition to the Opt-In and Opt-Out buttons.
- You can customize the text for any of the fields shown by entering your desired text in the corresponding field.
- When finished, click 'Save'.
 Click on the 'Opt-Out' button.
Customizing the Opt-In Window
- The Opt-In window can be customized for each individual Mailing List; as a result, the Opt-In settings are found under Mailing Lists.
- Select the desired List by clicking the radio button to the left of the List name. Then click on Actions > View Opt-in Settings.
- You can customize Opt-in settings only for Lists that have already been marked for Subscription (see Step One under Subscriptions, below).
- To view your Opt-in window, click on Actions > View Opt-in Page. This is the screen that will appear when a user clicks the 'Opt-In' button in the Subscription Options window from the previous step.
Getting the Subscription Link
Follow the steps below if you want to use the Subscription link in other messages or to send via other platforms, such as Teams or Slack. You can also use these steps to enter specific domains to allow subscriptions from, disabling all others.
 Go to PoliteMail > Account (Settings in v4.9) > Subscriptions.
- You’ll see radio button options for Opt-Out and Subscription (in v4.9, this is a drop-down), and click the 'Subscription' button.
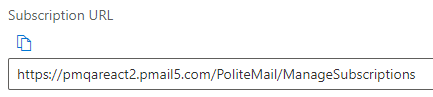
- Click 'Get Subscription URL' and a custom URL will display. This is the link that should default in your Opt-In / Opt-Out footer, but you can always update it.
- You can also place this URL in any other message you wish, even without the footer.
- Click Save when finished.
 Go to PoliteMail > Account (
Whitelisting Subscriber Domains
Follow the steps below to enter specific domains to allow subscriptions from. PoliteMail will block any domain not listed from subscribing.
- Go to PoliteMail > Account (Settings in v4.9) > Subscriptions.
- You’ll see radio button options for Opt-Out and Subscription (in v4.9, this is a drop-down), and click the 'Subscription' button.
- Under 'Allowed Subscriber Domains), list which subscriber domains are allowed. PoliteMail has security measures in place to ensure only the domains you choose are allowed to subscribe, eliminating SPAM bots that may try and subscribe to your lists.
- If left blank, any domain will be allowed to subscribe.
Step Three: Setting Opt-In and Opt-Out
With everything configured the way you want, you're ready to enable Opt-in / Opt-out in your messages. This is especially important if you are sending to a region with anti-spam laws. PoliteMail allows you to easily do so and places all recipients who have opted out on a List.
The process below describes how to enable opt-out for an individual message. You can also set PoliteMail to enable opt-out on all messages under Settings > Server > Enforcement > Enforce Opt-Out. Only Admins have access to this setting.
To turn on Opt-Out for a message:
- Select 'Enable Opt-Out'.
- For PoliteMail for the Outlook Desktop, click on the PoliteMail flag when composing your message and select 'Add/Remove Unsubscribe' ('Enable Opt-Out' in version 4.x)
- For PoliteMail Online, when composing your message, click on Send Options > Add/Remove Opt-Out.
- Once enabled, a footer will appear in your message stating who the message was sent to, who it was from, and with a link to allow the recipient to opt-out of further emails.

- This footer is required to display who the message was sent to and who it is from; PoliteMail pulls the sender and address from your Account Settings.
- The link at the bottom of the footer will take the user to the Subscription Options page from Step One.
Customizing the Footer
You can customize the footer by simply typing editing the text like any other text in your message.
- [RecipientEmail] is a token; you can insert you own under Personalization.
- The link to the Subscription Options window is generated from the 'Create the Subscription Link' process described below. To change the verbiage (label text) of the URL:
- For PoliteMail for the Outlook Desktop, right-click on the link and select 'Edit Hyperlink'. You can change the display text in the top field of the dialog that appears, and then click OK.
- For PoliteMail Online, click on the link, then click on the
 to change the label.
 to change the label.